UPDATE: We’ve added a post on the top cameras for photographing your artwork. Check it out here.
Have you been frustrated trying to find the right light, angle, and time of day to photograph your art? I have too, and can share some tips with you that will hopefully reduce your future photography anxiety. We also know that artists are afraid of technology as a stereotype, so we are going to work on breaking through that fear for those of you who fit the stereotype as I did a few years ago.
Part 1: Photographing Your Art
As artists, the most important thing after our artwork and our good name is the photographs of our work. Whether we are using photographs in brochures, artist bios, portfolio books, our email newsletters, social media, or on our website, high quality photographs that truly depict our work are of the utmost importance. The medium of your artwork will impact the difficulty of photographing your artwork. Three dimensional and extremely large pieces are the hardest because the light and shadow will impact your work more than if you are simply photographing two-dimensional pieces. I am going to focus on photographing two-dimensional artwork like paintings and drawings. I am an impressionist oil painter myself, and most of my artwork is oil on canvas or canvas board.
Light and Shadow
The most important factor that impacts your photos is light. Natural, indirect sunlight is the best. The best time to photograph your work is on a sunny day, in the shadow, without the sunlight directly hitting your work. I recommend this shooting method because I’ve shot artwork in all conditions, and indirect sunlight outside works the best in my experience. Some people recommend shooting in direct sunlight, and this can work sometimes, but a lot of times it produces a glare for me. So I would recommend trying out both methods and see what image looks the best for your work. I like shooting in the prime sunlight hours, usually between 10am and 2pm. This time of day is when the sun is highest in the sky, and won’t shine a warm glow on your painting that you’ll get in the early morning or early evening. Indoor shooting can work sometimes, but it’s much harder to get the right angle of the lighting so that it doesn’t cast a glare or change the color of your artwork. If you have a professional lighting setup, then indoor shooting can work great for you, but I prefer shooting outside in natural lighting.
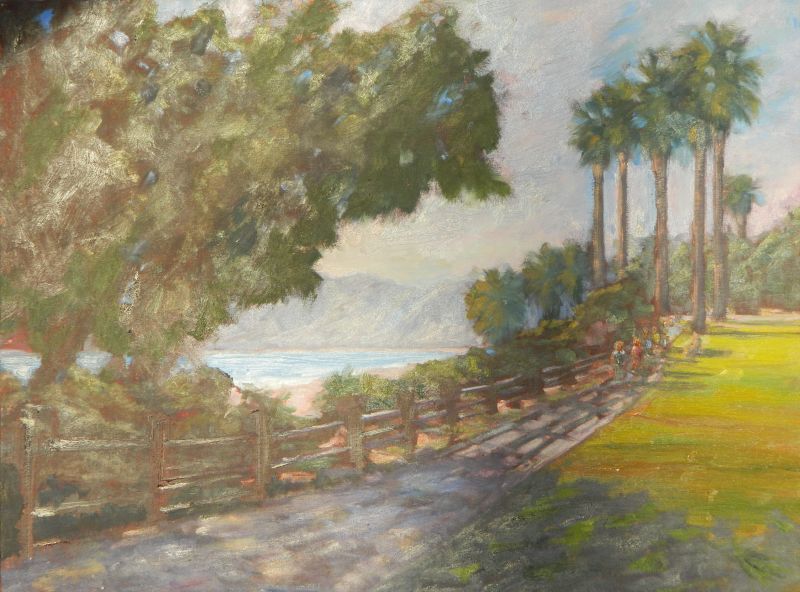 Shooting in direct sun can cause a strong glare on your work.
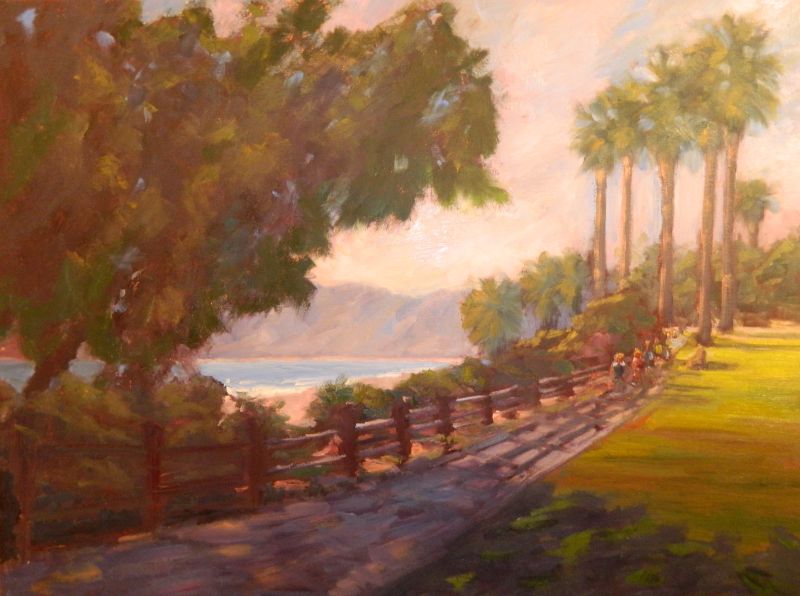
Although indoor light may produce more vibrant colors, they are not true to the painting.
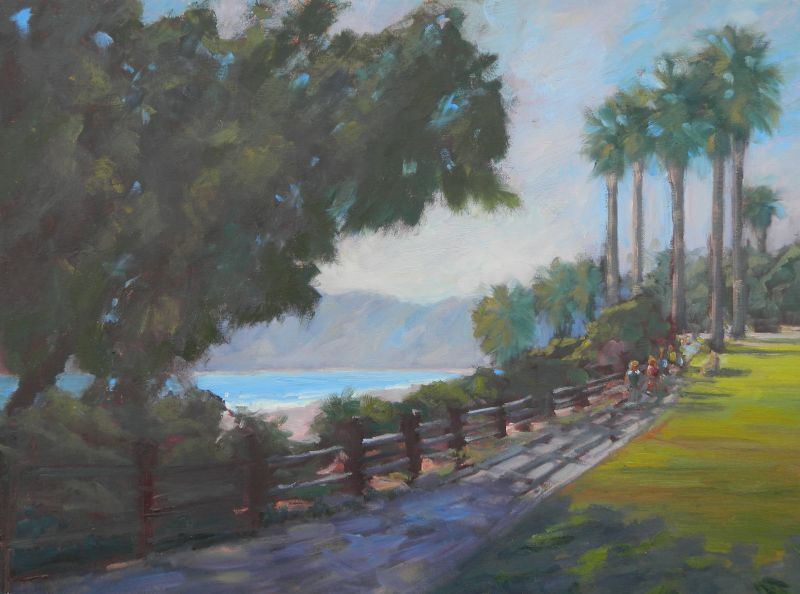 This is the result of an ideal shooting environment – in the shade on a sunny day.
Angle
The angle of your work can be a bit tricky, especially when you prop your painting up against the wall. I usually prop the painting up against the wall and then get the painting parallel and square in the frame of the digital camera before I snap, but it will take a few shots before you get that perfect one. If you want to take it to the next level, you can set up a tripod and a chair or easel to get your painting perfectly vertical while you snap the photo. I recommend zooming out a hair too far so that you get more than just the painting in the photo, you can edit out the background scenery later. This ensures that you don’t lose any part of your painting.
Camera
The camera you use is important as well – but we’re not talking about going out and spending $1,000+ on a camera, we are talking the bare minimum. I’ve experimented taking pictures with my iPhone, and compared to a digital camera, it just is not as good. There are times I will use my iPhone when I need to send a quick photo to a client or I want to get up a blog post quickly, but when you have more than a few minutes to dedicate to your photos, use a digital camera. You can get decent enough ones these days for a little over a hundred dollars, and as long as it is at least 5 megapixels, the quality will be good.
Part 2: Editing Your Photos
The main thing we want to do with our perfectly photographed photos is crop them and resize them. We will touch on editing the color a bit, but if we photographed them correctly, we shouldn’t need to mess with the color. I’ll also show you a few photo editing programs below that I have used in the past and their strengths and weaknesses.
Cropping and Resizing
Cropping is cutting out the areas of your photo that you don’t want anymore. When you get some of the background in your photo, you’ll want to crop down your photo to just the painting and nothing more. Irfanview makes this very easy. Secondly, you’ll want to resize your photo to a smaller size and resolution. Your photos will come off your digital camera very large in dimensions, which are measured in pixels (px). You’ll want to resize your photos to around 1000 pixels max for both the height and width. A safe size for a photo would be 800px wide by 600px high for a landscape oriented photo. If you want a fullscreen sized photo, you can go up to 1500px or larger, but the image will load much slower on your website and can cause frustration for your users. Additionally, when you resize your photos you’ll want to change the resolution from 300dpi, or whatever dpi it is, to 72dpi for the web. DPI stands for dots per inch, and the higher the dpi, the better the photos will look when printed. With images on the web, however, a higher dpi does not look significantly better than a resolution of 72dpi, but a high dpi will cause your images to load much slower and slow down your website speed.
Adjusting Color
The colors in your photo may come out a bit off when you view them on your computer. If you can, look at the photos on a few different screens to see how they will look to other people. If the colors are off, you can adjust the brightness, hue, saturation, and color to get your photo matching the real-life art piece. Two of the programs below – PicMonkey and Photoshop – will allow you to adjust the color on your photo. I recommend starting with PicMonkey as it is the easiest to work with for beginners.
Part 3: Programs for Editing Photos
Irfanview – Free desktop photo editor
irfanview.com Yes it’s a strange name, but it’s a surprisingly simple and effective photo editor. I love this program because it does a few simple things well. All I use it for is cropping and resizing. When you get some of the background in your photo, you’ll want to crop down your photo to just the painting and nothing more. Irfanview makes this very easy. Secondly, you’ll want to resize your photo to 72dpi for the web. When printing you want to print in 300dpi, but online you want the images at 72dpi because they look the exact same as 300dpi and they are smaller in size so your website will load faster.
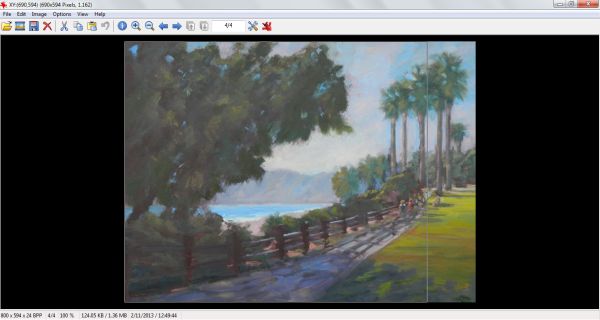 A view of editing images in Irfanview
PicMonkey – Free online photo editor
picmonkey.com PicMonkey is a very new online photo editing tool, and I must say I was amazed the first time I saw it. It is free to use for all of the editing capabilities you will need, and they offer a few premium options if you want those as well. It works right from your browser so there is nothing to download and install, and you can use it from any computer you happen to be working on if you are travelling or away from home and not using your primary computer. You can easily crop, resize, and perform any basic functions you would ever need. The tool provides a lot of fun options for playing with the color of your images with Instagram-like filters, but you most likely won’t want to be altering the color of your images except to restore the look to the true color of your work.
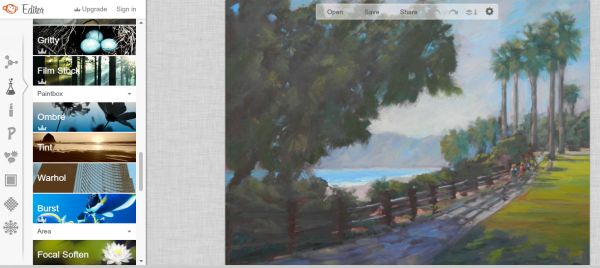 PicMonkey has a fun and intuitive interface for editing your photos.
Photoshop – Paid high-powered desktop photo editor
photoshop.com I’m sure most of you have heard of Photoshop. It is the standard of the graphic design world, and is a very powerful photo editor. The great thing is that you can do some high powered photo editing and retouching and create really powerful images. The downside is that the amount of features can be overwhelming if you just want to crop and resize your photos. Most of the time you won’t need Photoshop, but if you are creating brochures, collages, or need to do some advanced photo editing, this is the program you want to use.
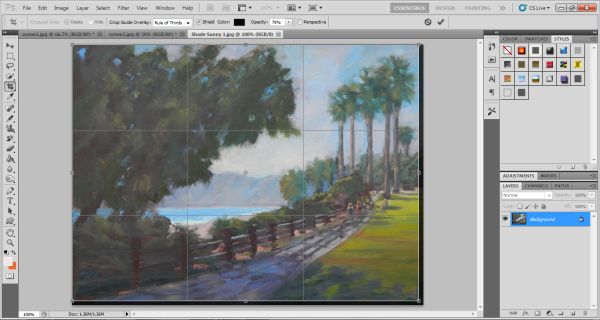 A view of the robust editing options in Photoshop.
There are more options than ever to edit your photos for the web, and the tools get cheaper and easier by the year. Photos bring our art to our customers online and are crucial to our career’s success on the internet. Now that you’ve successfully published your art online, your work is just getting started and it’s time to share your art online with others and optimize your images for your website.
NOTE from Cory: Once you have your photos shot and processed, consider this post on Image SEO (aka, how to make sure your images are found by search engines).
Kathleen Robison is an impressionist oil painter from San Clemente, CA. She paints landscapes, seascapes, and figures and exhibits at Studio 7 Gallery in Laguna Beach. For more information, visit her website at kathleenmrobison.com.
Good tips.. I’ve been working with a photographer on my website, he suggested irfanview as well. I have photoshop but I don’t have the million years I think it would take me to understand it. Also my friend told me I could generally keep dpi at 200 for most things..but I think I like your advice–I’ll try that too. Seems to make sense. I think my friend just thought I was hopeless technically. (close to true, but I am a granny–my usual excuse)
Love getting your emails!
Very informative! Thanks for sharing:-)
Fantastic job on this. Keep these great posts coming!!
Thank you for this great post. This is just what I needed. As a beginning artist I have just designed a new website and have been fustrated trying to get great pics of my work. Now if only the sun would shine in western PA I’ll be in business!
John
I took some of your advice, and some of my photographer friend’s advice & a program I really like, and came up with what I think is one of the best photos I’ve done to date. I don’t have canvas art–so its a somewhat different situation. I make small things and sell them–usually wedding cake toppers. Anyhow–I used sketchbook pro to edit my pix instead of irfanview. its actually easier. I set the dpi to 200 as my friend had suggested. I took the shots from further back than I usually do–knowing I would crop them. I did the pix around noon in the shade, of a sunny say. here is one of my results– I really like how it turned out. https://www.etsy.com/listing/125624921/cute-wedding-cake-topper-personalized?ref=br_feed_3
Unfortunately, I haven’t had much luck with shooting in the shade on a sunny day. When I’ve tried that, the photo picks up a decidedly blue cast from the sky and then I have to do a lot of color fiddling in Photoshop.
Instead, I try for a day that’s “cloudy bright”, with no direct sunlight and light cloud cover. I find the light is more even and since the clouds are more or less white, there are no weird color casts picked up. Cloudy days with snow on the ground are also good.
Great suggestions. Very helpful I am sure to artists in need of some basic info on how to do it.
However as I run a giclee printing business an do this sort of work all the time let me add some other suggestions. Taking your work outside to photograph works if you live in a climate where you can do this all year around. But as a resident in upstate New York there is a period from November to April where it is either too cold or snowy to do this. Also you can never know what the light will be like day to day, bright and sunny, cloudy, etc. And the light color varies greatly between sunny and cloudy.
So I have established a room indoors where I can set up studio lights. Now this means one has to buy studio lights or as a low cost alternative go get clamp-on lights at Home Depot and a couple of flood light bulbs. Then find a room that has an available wall to set up the artwork. Locate the lights 45 degrees either side of the art work and direct them at the ceiling so that bounced light hits the work, a much softer light. Then set the color setting of your camera to incandescent as that is the kind of light you are using. The thing about an established space is that it is always there and available.
Of course I do most of my post editing in software like Photoshop but the other software mentioned here I am sure does a good job. Photoshop Elements ($100) is another, and much less costly than the Full Photoshop and has many of the features of the full program. Often times it is in the post processing that I get the image looking right whether I am using it for making prints or online for my web site.
There is more but perhaps this will help.
thanks Stan! Great suggestions!
Hi Abundant Artist,
I own Art House Reproductions in Australia and we specialise in copying artwork for reproduction. Just want to clarify a couple of common mistakes here.
First DPI stands for Dots Per Inch and refers to the droplets in ink put down by a printer. The correct term is PPI, Pixels Per Inch and is used whenever referring to a digital image on your computer.
Secondly, when loading images online it doesn’t make any difference if they are 72 or 300ppi – they will be viewed on the monitor at the pixel dimensions you set 1000 x 700px for example. the PPI will change the physical dimensions of the image when you print it.
For example 1000pixels at 300ppi measures 3.333″ (1000 divided by 300) but 1000pixels at 72ppi measures 13.888″. For best results when printing the image should be 300ppi.
Hope this helps your readers.
Hi Mark, thanks for commenting! DPI & PPI are commonly confused on the web, to the point where they can mostly be used interchangeably. The only people who care are people like yourself! 🙂
Other than this point, the rest of the post is factually correct.
Yes, it’s the OCD coming out in me 🙂 Great blog by the way!
Very informative article, thanks from ART Ellipse
Cory, the guests you invite to blog always create impressive posts, & this post is of the same high calibre.
I miss the format where you introduced the guest. If you’ve decided to streamline the format to get to the point quickly (a virtue), at the very least the byline credit belongs at the top of the article, don’t you think?
Great article! I struggle with producing quality images of my artwork and still seeking ways to improve the process.
Could you recommend camera specifics and brand ?
Thank you
Linda
Thank you for this post. I feel like every time I try to take a picture of my art it comes out really badly. Some of it is too large to just scan.
And unfortunately I live in Oregon, so we really don’t get that much sun. -_- I love to use natural lighting, but it’s few and far between!
Thank you for this blog, very informative. I have tried to photograph my work outside but even if I’m in the shade still comes too light. I use Photoshop to edit, size and crop my pics. I will definitely use PicMonkey when I don’t have my computer. As per size I convert my dpi to 72 for web use and, of course, leave the original 300dpi for printing.
What suggestions can you make on photographing stained glass panels and 3 dimensional fused glass products such as vases and bowls etc.?
Dear Cory,
Yours is the most informative and generous website.
As soon as I have acquired the basic skills I will get my website running.
Promises, promises.
Thank you, really encouraging and helpful. I tried this in direct sunlight and because I had no shady spot on the roof, I rigged up an old net curtain above the canvass , it diffused the light hitting the work and reduced all of the glare, so the painting remained very bright.
Thank you for this article. I have been procrastinating about drawing to sell on line because I couldn’t get past a few obstacles when it came to preparing it for an online venue. I tried a couple of the programs mentioned here, and now, I’m excited again.
I am in the process of taking pictures of my paitings only.
Do you think is better to set them up on a wall or just to show the picture only?
What about file size? In Photoshop after I have set image to 72ppi and 1000px x 1000px I can chose the file size.. it gives me a choice to save in a maximum file size (12) down to a low file size(3)….which makes a huge difference, for example, max would be 1.5m and low would be 195k….and everything in between – same image, same pixels. I understand the 195k image is going to load faster, but quality of image for my paintings is VERY important….are there any recommendations on file size?
Thanks
Callie
All things being equal, smaller is better. Worst thing that will happen is you upload it and it doesn’t look good, so you size back up from the raw file and retry it.
Thanks for all the information, I’m trying to learn these things and this will help.
it has a very prefect look
Great post with very helpful points!
I would like to add a few points:
– The camera does not need to be expensive but it should shoot RAW format. It makes a huge difference for the accuracy of colors.
– Do keep a copy of your high-resolution photos. It will be useful for prints.
– For this type of adjustments, Lightroom is much more suitable than Photoshop. And cheaper if you catch the stand-alone version (compared to the subscription version).
thanks for the post Kathleen. I just came home from a couple of weeks painting plein air in and around Laguna. Back to the chilly Canadian winter.
I am new to Instagram but old school with photoshop. So no problem resizing and adjusting for lower resolution ( because I certainly don’t want to post large printable images of my original art online…)
but as Instagram only uploads from mobile devices…how are you efficiently uploading batches of pics TO THE PHONE from a laptop or desktop ?
I have seen a Weebgram program that will do a workaround.
Lots of great tips but I feel that this site is dead. Comments are out dated. But the advice is still useful.
Not sure if this site is useful for me.
The medium of your artwork will impact the difficulty of photographing your artwork.
Thank you for simplifying my photo editing! I am relieved!
Love your thoroughness.
This is greatly helpful for a beginner like me who need to do graphic design.
Of Course Canva is one of the popular graphic design tool,
but by reading your list of other tools,
I was simply amazed. Excellent one and really helped me!!!